
Dutch Oven Temperature Control
Controlling the temperature of your Dutch oven when camp cooking or cooking in the outdoors takes a bit of trial and error to master. There are quite a few variables involved including ambient temperature, altitude, humidity and wind as well as the fuel you use. The aspiring outdoor chef will find it to be as much of an art as it is a science. Fortunately you will get the hang of it pretty quickly once you learn a couple of basic concepts. The information provided on the tabs below should provide you with a pretty solid understanding of what you need to know to get started.
- Temperature Control Basics
- Charcoal Placement
- Weather
- Helpful Tips & Tricks
For the beginner, it is easy to start with two basic rules of thumb, "The Rule of Three" and "Double up". Both are used with charcoal briquettes as the heat source and both provide the same result temperature-wise. The rule you use depends upon what type of cooking you are doing.
The Rule of Three
For baking you want to have more heat coming from above. In order to get 325° F for 30 to 40 minutes, take the diameter of your oven and add three to determine the number of coals to place on top of your oven. Subtract three to determine the number of coals to place beneath your oven. Place your coals in an evenly spaced checkerboard pattern to obtain even heat.
Tip: For stews, chilies, etc. you will want more heat coming from the bottom so just reverse the Rule of Three (oven diameter -3 on top, +3 underneath for 325°).
Double Up
For roasting you want to have even heat from both top and bottom. To get 325 degrees F for 30 to 40 minutes use a number of coals that is double the diameter of your Dutch oven. Place an equal number of coals in an evenly spaced checkerboard pattern on top of and beneath your oven to obtain even heat.
Frying
When Frying foods in your Dutch oven you will obviously want to have all of the heat coming from the bottom. This also applies when using the lid of your oven as a griddle. To do this, support the upside-down lid of your oven with a couple of bricks or flat stones. Place your coals under the lid and you have a griddle that is ideal for making pancakes or fried eggs. I'll have mine over medium thank you!
Deep Frying
Its great to have freshly made donuts on a camp out. Unfortunately deep frying can be dangerous - especially around open flame. For safety sake, please leave deep frying of food to adults as this is not a technique younger Dutch oven chefs should be using. If you do have a flare up, don't panic and don't use water. The flame will go out if you simply place the lid on your Dutch oven.
A Note on Charcoal
For temperatures other then 325° you will obviously need to add or subtract briquettes. I typically add two charcoal briquettes for each 25 degrees of temperature needed. Also, these methods are based upon the use of regular charcoal briquettes. Do not use Match Light Charcoal for Dutch oven cooking. Match light briquettes are soaked with lighter fluid which cause them to burn hotter and faster then does conventional charcoal.
Your Cooking Area
The first thing to keep in mind when preparing your camp cooking area is to be sure to have a clear, flat surface free from foot traffic for cooking. Dutch oven stands and tables are good to have but you can also cook directly on the ground. If cooking on the ground look for a flat stone or dry bare earth surface. Avoid using grass or gravel surfaces. Cooking on grass will damage the grass and Dutch oven feet will sink into the gravel. Also, these surfaces retain moisture which can extinguish your charcoal. Dutch oven tables, stands or large flat stones are the best choices for your camp cooking area.
Charcoal Layout
Your cook area has been chosen, your meal assembled and it is now time to start cooking. How do you apply the heat? For soups and stews you can always hang your oven from a tripod over a low fire or use coals from your fire. However charcoal briquettes are really the most common fuel that most Dutch oven cooks use. This is because of the ease with which one can regulate temperature when using briquettes.
There are basically two schools of thought regarding the placement of charcoal on Dutch ovens, the checkerboard pattern and the ring method.
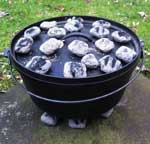
The Checkerboard Pattern
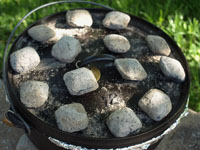 The checkerboard pattern method is designed to evenly distribute the heat over and under the Dutch oven. With this method, charcoal briquettes are placed in a checkerboard pattern beneath and on the lid of your Dutch oven. This is intended to avoid potential hot spots that can result in burnt food. This would probably be the better method to use when cooking with aluminum Dutch ovens as they are more prone to hot spots.
The Ring Method
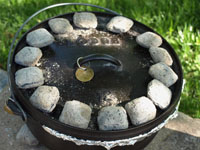 When using the ring method, charcoal briquettes are placed in a ring under the Dutch oven and on the lid. For low heat, a single ring is placed around the outside diameter of the oven and on the lid. For medium heat, two rings of coals are placed under and on the oven. For high heat one uses three rings of coals.
Which style is the right style to use? It really comes down to preference. I actually use both methods. In warmer weather I tend to use the checkerboard pattern. In colder weather when you need to use more coals, or when using coals from a camp fire, I tend to use the ring method. All that I can do is recommend that you experiment and use the method that you are most comfortable with.
Effects of Weather
Be aware that controlling the temperature of your Dutch ovens is going to be affected by environmental conditions. Altitude, humidity, temperature, and wind all come into play.
Altitude
The elevation of the area where you are cooking can effect on how much charcoal you need for your Dutch ovens. If you are cooking in higher elevations you will need more coals to compensate for the thinner air.
Humidity
High humidity reduces the amount of air available for combustion. This can result in difficulty getting coals lit and can also require more charcoal to obtain a desired temperature. One trick to use if cooking on the damp surfaces you will experience on high humidity days is to place a sheet of aluminum foil on the surface you will be cooking on. Place your coals on the foil then place your Dutch oven over the coals. This will provide a dry surface for your coals.
Temperature
Most of the temperature guidance you will find regarding charcoal usage when Dutch oven cooking works well with outdoor temperatures in the 60° to 70° range. However hot or cold temperatures as well as sunlight will have an influence on your charcoal requirements. Cast iron Dutch ovens left in bright sun can easily develop internal temperatures over 100° and be hot to the touch. Warm temperatures and sunlight can certainly reduce your charcoal needs. Conversely, cold air will suck heat away from your dutch ovens. I like to use a wind screen in cold temperatures and generally add 1 charcoal briquette for each 10° in temperature below 60°.
Wind
Three things are needed for fire - oxygen, fuel and heat. Wind adds oxygen to the mix which causes coals to burn faster and a bit hotter. The use of a wind screen helps quite a lot and wind screens are very simple to make. Try using a cylinder made from aluminum flashing material that is a few inches in diameter larger then your ovens. Placed around your Dutch oven, this works quite well.
Temperature Control Tips and Tricks
Over time you will learn or pick up tips and tricks as you practice your Dutch oven cooking. Watch what other cooks are doing and ask questions. People are usually more then happy to share what they have learned. Below are a few general tricks I have picked up along the way.
- Use good quality charcoal briquettes. The performance you get from quality name brand briquettes is consistent and repeatable making temperature control easier. As I've mentioned elsewhere, do not use Match Light charcoal for Dutch oven cooking.
- Use a Dutch oven table or stand with a wind screen. It will allow you to more easily control your temperature by keeping your coals off of the ground and reducing the effect of the wind on how your charcoal burns.
- If you have to cook on the ground place a sheet of aluminum foil down first. The foil will prevent ground dampness from affecting your charcoal and will help to protect the ground underneath your Dutch oven. After the coals are out clean up is easy. Simply fold the ash inside the foil and discard properly.
- Your Dutch oven temperature is too low if after 20 minutes your food is not boiling. Add charcoal briquettes.
- If food is rapidly boiling your heat is too high, remove charcoal briquettes.
- The temperature of your Dutch oven is too high if steam is escaping through the seam between the oven and lid, remove charcoal briquettes.
- Before browning meats, pre-heat your Dutch oven before placing it on the coals. The hot oven will have a good searing temperature and you will need less charcoal. I will often use coals in my camp fire for this purpose.
- View charcoal briquette/temperature charts as guidelines only. The actual number of briquettes required for a given temperature can vary based upon multiple variables such as weather or even the manufacturer of the Dutch oven. Some Dutch ovens have more mass then do others. Heavier ovens such as those made by MACA will require more charcoal to get up to temperature.
- If using aluminum dutch ovens reduce the amount of coals you would use when cooking with cast iron Dutch ovens by about 25%. Thus for 325°, an aluminum Dutch oven will need 18 coals total compared to the 24 coals that a cast iron Dutch oven would require.
- Be sure to use pocket food thermometers. They are inexpensive and allow you to be sure that internal meat temperatures are up to proper safe levels. A meat cooking temperature chart can be found here.
